API Key Authentication Guide
API Key Authentication Overview
The AI Security Gateway uses API keys for authenticating client requests to proxied MCP and LLM services. This document explains how to create, manage, and use API keys for secure proxy access.
API Key Authentication Architecture
API Key Components
User Group (Container)
    ├── API Keys (Multiple keys per group)
    │   ├── Key 1: uag_abc123...
    │   ├── Key 2: uag_def456...
    │   └── Key 3: uag_ghi789...
    └── Proxy Access (Which proxies can be accessed)
        ├── MCP SSE Dev Server (Port 8041)
        ├── OpenAI LLM Proxy (Port 8030)
        └── custom-LiteLLM (Port 8033)
API Key Authentication How It Works
- User Group acts as a container that groups API keys and defines proxy access permissions
- API Keys belong to a user group and automatically inherit the group's proxy access
- Proxy Access defines which proxy instances the user group (and its API keys) can use
✅ Yes! API keys automatically have access to ALL proxies assigned to their user group.
Creating and Managing API Keys
Step 1: Create a User Group
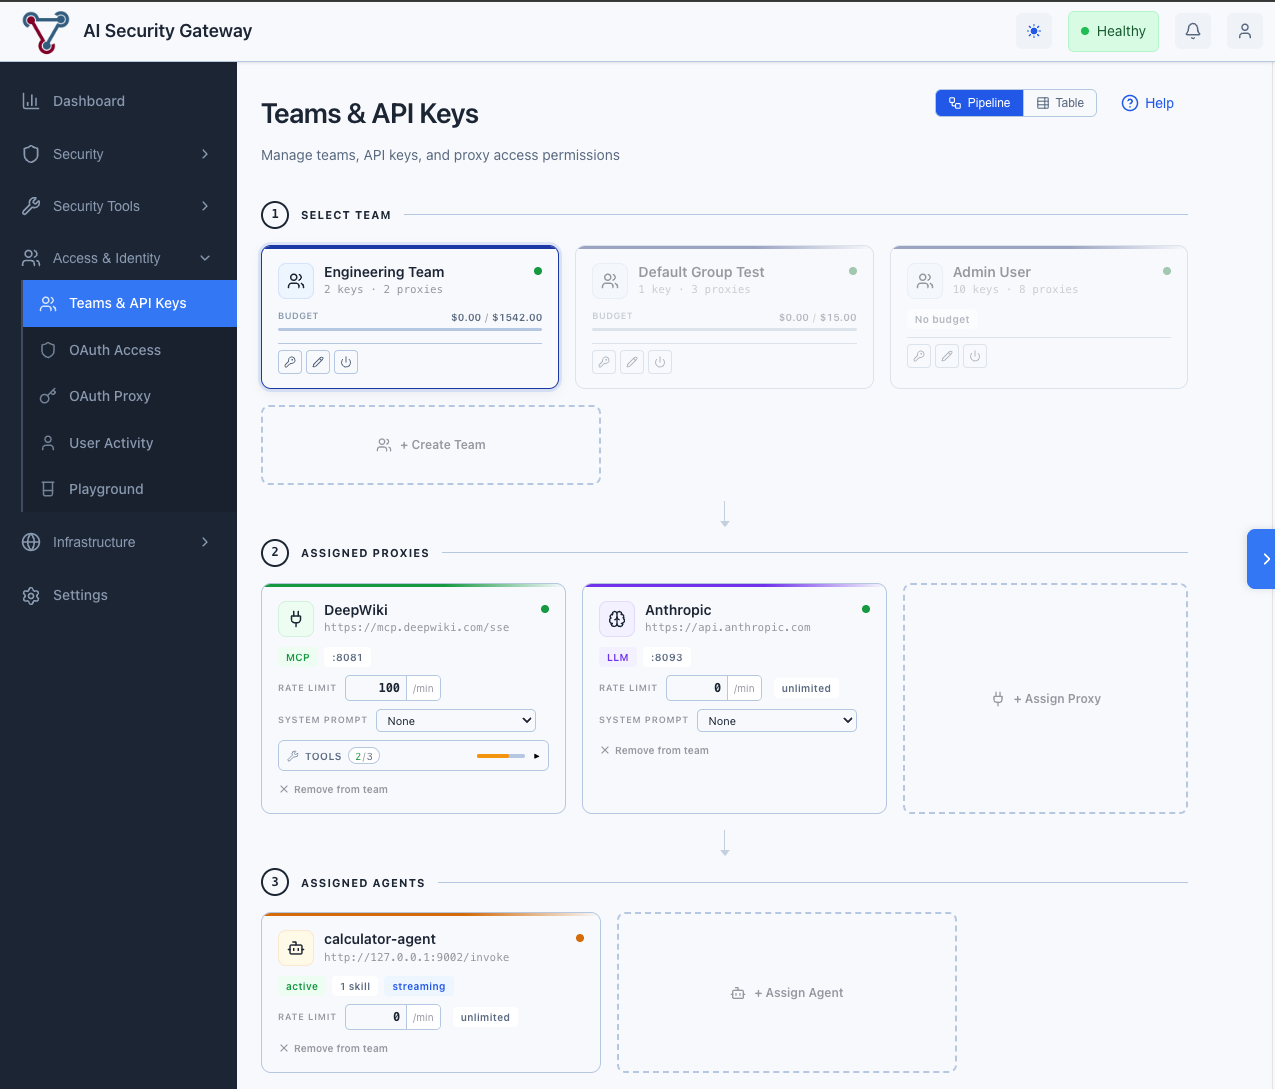
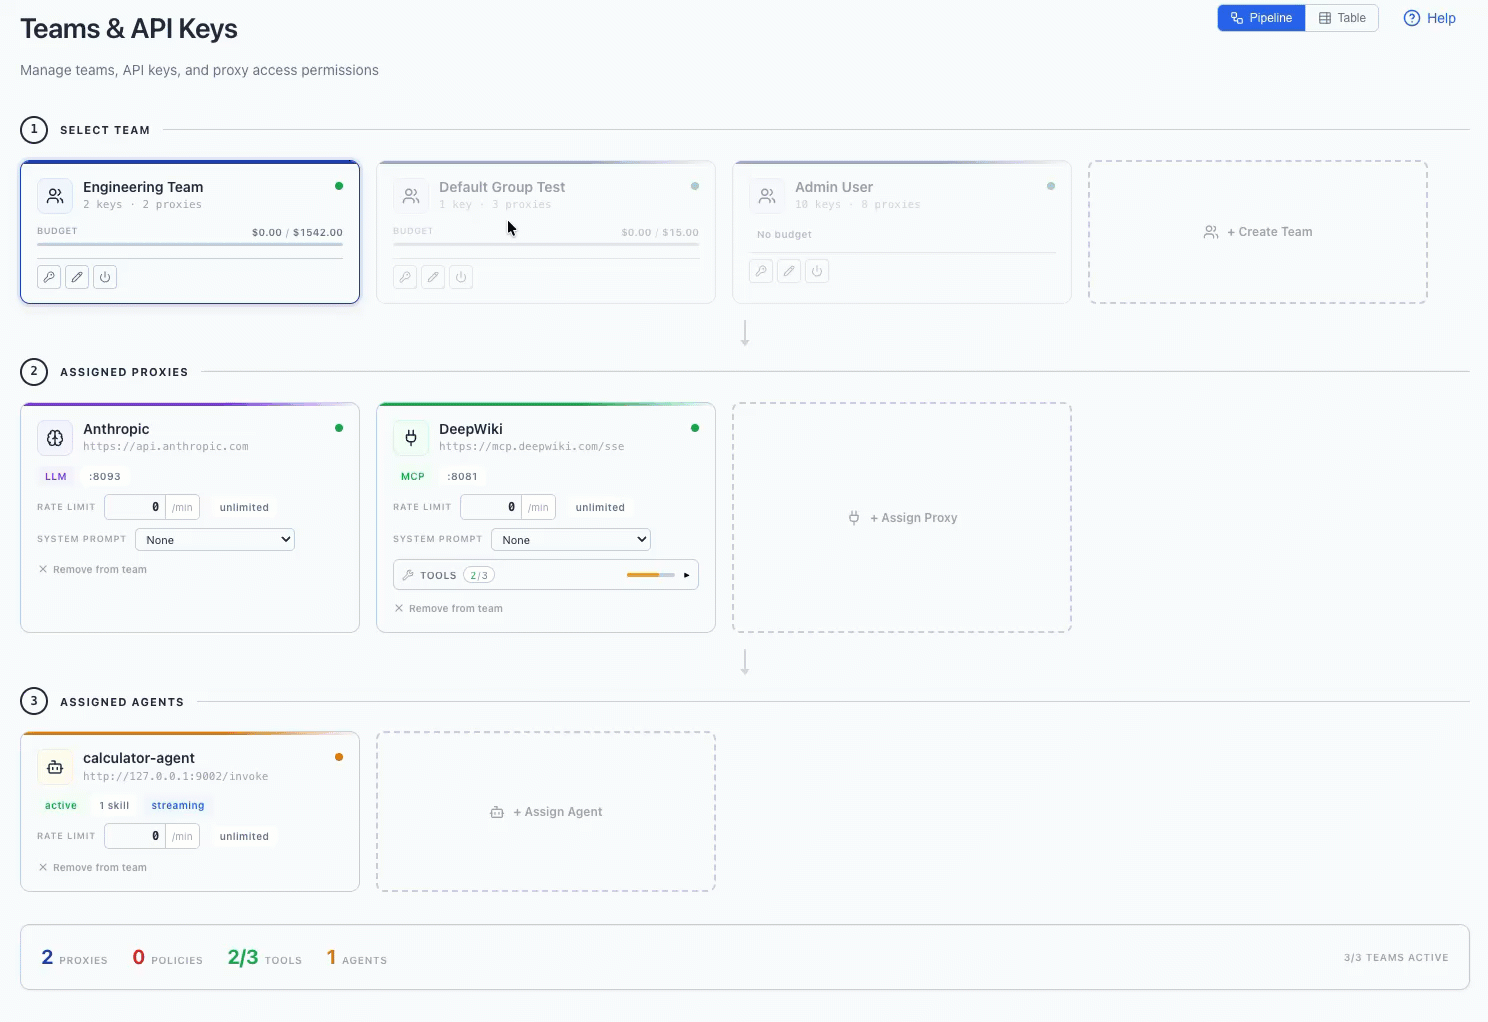
- Navigate to Access & Identity → Teams & API Keys
- Switch to Table mode (toggle in the top-right header) and click Create Team Group
- Enter:
- Name: e.g., "Development Team"
- Description: Optional description
- Monthly Budget (Optional): Set a monthly spending limit in USD (e.g., 1000.00)
- Budget Warning Threshold (Optional): Set a warning threshold (0-1, e.g., 0.8 for 80% of budget)
- Block at Threshold (Optional): If enabled, requests will be blocked when the threshold is reached. If disabled, requests continue with a warning.
- Click Create Group
Step 2: Assign Proxy Access
Using Pipeline mode (recommended): Select a team card, then use the Gateway (MCP/LLM Proxies) section to assign proxies and set rate limits inline.
Using Table mode: Click a team row → Proxy Access → + Assign Proxy, select which proxy instances this group should have access to, and click Assign Proxy.
Step 3: Create API Keys
- In the same user group detail view
- In the API Keys section, click + Create API Key
- Enter an optional key name (e.g., "Production Key")
- Click Create Key
- ⚠️ IMPORTANT: Copy the API key immediately - it will only be shown once!
Example API Key: uag_kbx9abcdef1234567890abcdef1234567890
Authentication Methods
The API gateway supports three authentication header formats:
Method 1: X-API-Key Header (Recommended)
curl -H "X-API-Key: uag_kbx9abcdef1234567890..." \
     http://localhost:8041/your-endpoint
Method 2: Bearer Token
curl -H "Authorization: Bearer uag_kbx9abcdef1234567890..." \
     http://localhost:8041/your-endpoint
Method 3: ApiKey Scheme
curl -H "Authorization: ApiKey uag_kbx9abcdef1234567890..." \
     http://localhost:8041/your-endpoint
API Key Flow
How Authentication Works
When a request arrives at a proxy endpoint, the gateway performs these checks:
1. Extract API Key
   └─ Check headers in priority order:
      • X-API-Key header (recommended)
      • Authorization: Bearer <token>
      • Authorization: ApiKey <token>
   └─ If missing → 401 Unauthorized

2. Validate API Key
   └─ Look up key in database (using secure hash)
   └─ Check if key is active and not expired
   └─ If invalid → 401 Unauthorized

3. Validate User Group
   └─ Check if user group is active
   └─ If inactive → 401 Unauthorized

4. Check Proxy Access
   └─ Verify user group has access to this proxy
   └─ If no access → 403 Forbidden

5. Check Budget (if configured)
   └─ Verify monthly budget not exceeded
   └─ If exceeded → 402 Payment Required

6. Check Rate Limit (if configured)
   └─ Use token bucket algorithm
   └─ If exceeded → 429 Too Many Requests

7. Record Usage
   └─ Update last used timestamp
   └─ Track request count

8. Forward Request
   └─ Add API key context to request
   └─ Preserve original Authorization header
   └─ Forward to target service
Header Priority
The gateway checks for API keys in this order:
X-API-Keyheader (recommended)X-API-Key: uag_abc123...Authorization: BearerheaderAuthorization: Bearer uag_abc123...Authorization: ApiKeyheaderAuthorization: ApiKey uag_abc123...
Note: Only one token is extracted per request. The first matching header is used.
Example: Claude Code Authentication
When using Claude Code with an API key configured as a Bearer token:
Request from Claude Code:
Authorization: Bearer sk-STk......
Content-Type: application/json
Gateway Processing:
- Extracts token from Authorization header
- Validates against database (using secure hash)
- Checks user group permissions
- Verifies proxy access
- Tracks usage
Forwarded to Target (LiteLLM):
Authorization: Bearer sk-STk......  ← Same token preserved
Content-Type: application/json
Key Point: The gateway uses the same token for both:
- Gateway authentication (validates permissions)
- Target service authentication (passes through unchanged)
This means you only need one token configured in Claude Code!
Example Usage
Accessing an MCP Server
# Using the MCP SSE Dev Server (port 8041)
curl -X POST \
  -H "X-API-Key: uag_kbx9abcdef1234567890..." \
  -H "Content-Type: application/json" \
  -d '{"jsonrpc":"2.0","method":"tools/list","id":1}' \
  http://localhost:8041/mcp
Accessing an LLM Proxy
# Using the OpenAI LLM Proxy (port 8030)
curl -X POST \
  -H "X-API-Key: uag_kbx9abcdef1234567890..." \
  -H "Content-Type: application/json" \
  -d '{
    "model": "gpt-4",
    "messages": [{"role": "user", "content": "Hello!"}]
  }' \
  http://localhost:8030/v1/chat/completions
Python Example
import requests

API_KEY = "uag_kbx9abcdef1234567890..."
PROXY_URL = "http://localhost:8041/mcp"

headers = {
    "X-API-Key": API_KEY,
    "Content-Type": "application/json"
}

payload = {
    "jsonrpc": "2.0",
    "method": "tools/list",
    "id": 1
}

response = requests.post(PROXY_URL, json=payload, headers=headers)
print(response.json())
JavaScript Example
const API_KEY = "uag_kbx9abcdef1234567890...";
const PROXY_URL = "http://localhost:8041/mcp";

const response = await fetch(PROXY_URL, {
  method: "POST",
  headers: {
    "X-API-Key": API_KEY,
    "Content-Type": "application/json",
  },
  body: JSON.stringify({
    jsonrpc: "2.0",
    method: "tools/list",
    id: 1,
  }),
});

const data = await response.json();
console.log(data);
API Key Format
API keys follow this format:
uag_<random_string>

Example: uag_kbx9abcdef1234567890abcdef1234567890- Prefix:
uag_(AI Security Gateway) - Length: Variable (typically 40+ characters)
- Characters: Alphanumeric (a-z, A-Z, 0-9)
Budget Management
Monthly budget limits can be configured per user group to control LLM proxy spending:
- Monthly Budget: Optional monthly spending limit in USD (e.g., 1000.00)
- Budget Warning Threshold: Optional warning threshold (0-1, e.g., 0.8 for 80% of budget)
- Block at Threshold: Optional setting to block requests when threshold is reached (default: false, only warns)
- Scope: Per user group (applies to all API keys in the group)
- Reset: Automatic reset at the start of each calendar month, or manual reset via API
- Enforcement:
- Budget Exceeded (100%): Requests are always blocked (HTTP 402 Payment Required)
- Threshold Reached: Behavior depends on "Block at Threshold" setting:
- If enabled: Requests are blocked (HTTP 402 Payment Required)
- If disabled: Requests continue with warning headers
Configuring Budgets
When Creating a User Group:
- Navigate to Access & Identity → Teams & API Keys
- Switch to Table mode and click Create Team Group
- Enter budget fields:
- Monthly Budget: Set monthly spending limit (optional)
- Budget Warning Threshold: Set warning threshold 0-1 (optional, default: 0.8)
- Block at Threshold: Enable to block requests when threshold is reached (optional, default: false)
- Click Create Group
When Editing a User Group:
- In Table mode, click Edit on an existing user group
- Update Monthly Budget, Budget Warning Threshold, and Block at Threshold as needed
- View current month spending and budget utilization
- Click Update Group
Budget Enforcement
When a user group has a monthly budget set:
- Budget Check: Performed before each proxy request
- Current Month Spending: Calculated from token usage records for the current calendar month
- Budget Exceeded (100%): Requests return HTTP 402 Payment Required with error message
- Threshold Reached: Behavior depends on "Block at Threshold" setting:
- If Block Enabled: Requests return HTTP 402 Payment Required with threshold error message
- If Block Disabled: Requests continue, but
X-Budget-Warning: trueheader is added
- Response Headers (when budget is set):
X-Budget-Limit: Monthly budget amountX-Budget-Used: Current month spendingX-Budget-Remaining: Remaining budgetX-Budget-Utilization: Utilization percentage (0-100)X-Budget-Warning: "true" if warning threshold reached (only when block is disabled)
Budget Reset
Budgets automatically reset at the start of each calendar month. You can also manually reset a budget:
Via API:
PUT /api/v1/user-groups/{id}/reset-budgetVia Web UI:
- Navigate to Access & Identity → Teams & API Keys (Table mode)
- Click Edit on a user group with a budget
- Budget status shows current month spending
- Budget automatically resets on the 1st of each month
Budget Status
Check budget status for a user group:
Via API:
GET /api/v1/user-groups/{id}/budget-statusResponse:
{
  "success": true,
  "data": {
    "user_group_id": 1,
    "monthly_budget": 1000.0,
    "current_month_spending": 750.0,
    "budget_remaining": 250.0,
    "budget_utilization_percent": 0.75,
    "is_exceeded": false,
    "is_warning_threshold": false,
    "warning_threshold": 0.8
  }
}
Via Dashboard:
- Navigate to Dashboard → AI Usage Metrics tab
- View Budget Status card showing all teams with budgets
- See budget utilization, warnings, and exceeded budgets
API Key Authentication Rate Limiting
Rate limiting can be configured per proxy access assignment in the User Groups interface:
- Rate Limit: Requests per minute (default: 0 = unlimited)
- Scope: Per API key, per proxy instance
- Algorithm: Token bucket (refills at 1 token/second)
- Configuration: Can be set when assigning proxy access or edited inline for existing assignments
- Response Headers (when rate limited):
X-RateLimit-Limit: 100
X-RateLimit-Reset: 1698765432
HTTP 429 Too Many Requests
Configuring API Key Rate Limits
Using Pipeline mode:
- Navigate to Access & Identity → Teams & API Keys (Pipeline mode)
- Select a team, then in the Gateway (MCP/LLM Proxies) section click + Assign Proxy
- Select the proxy and set the rate limit inline
- Edit rate limits directly on existing proxy cards
Using Table mode:
- Navigate to Access & Identity → Teams & API Keys (Table mode) → click a team → Proxy Access
- Click + Assign Proxy
- Select the proxy from the dropdown
- Enter Rate Limit (requests per minute):
0= Unlimited (default)60= 60 requests per minute (1 per second)300= 300 requests per minute (5 per second)
- Click Assign Proxy
Editing Existing Rate Limits (Table mode):
- Navigate to the Proxy Access table for a user group
- Find the proxy assignment you want to edit
- Click Edit in the Rate Limit column
- Enter the new value (0 for unlimited)
- Click the ✓ button to save or ✕ to cancel
How Rate Limiting Works
The rate limiter uses a token bucket algorithm:
- Each API key has a virtual "bucket" of tokens per proxy
- Bucket capacity = rate limit value (e.g., 60 tokens for 60 req/min)
- Tokens refill at 1 token per second
- Each request consumes 1 token
- If no tokens available → 429 error with reset time
Example with 60 req/min limit:
- Initial: 60 tokens available
- After 10 requests: 50 tokens remaining
- After 60 seconds: Back to 60 tokens (full refill)
- Burst capacity: Can make 60 requests instantly, then 1 per second
API Key Lifecycle
Active Key
- ✅ Can make requests
- ✅ Tracked in usage statistics
- ✅ Last used timestamp updated
Revoked Key
- ❌ Cannot make requests
- Returns:
401 Unauthorized - Message:
"Invalid API key"
Expired Key (if expiration set)
- ❌ Cannot make requests
- Returns:
401 Unauthorized - Message:
"API key has expired"
API Key Error Responses
Missing API Key
{
  "success": false,
  "error": "Missing API key"
}
HTTP Status: 401 Unauthorized
Invalid API Key
{
  "success": false,
  "error": "Invalid API key: key not found"
}
HTTP Status: 401 Unauthorized
No Proxy Access
{
  "success": false,
  "error": "API key does not have access to this proxy"
}
HTTP Status: 403 Forbidden
Rate Limit Exceeded
{
  "success": false,
  "error": "Rate limit exceeded"
}
HTTP Status: 429 Too Many Requests
API Key Security Best Practices
1. Key Storage
- ❌ Never commit API keys to version control
- ❌ Never log API keys in plain text
- ✅ Store keys in environment variables
- ✅ Use secrets management systems (AWS Secrets Manager, HashiCorp Vault)
2. Key Rotation
- ✅ Create new keys periodically
- ✅ Revoke old keys after migration
- ✅ Use descriptive names to track key usage
3. Principle of Least Privilege
- ✅ Only assign proxy access to groups that need it
- ✅ Create separate user groups for different teams/purposes
- ✅ Use multiple API keys per group for different environments
4. API Key Monitoring
- ✅ Review API key usage statistics regularly
- ✅ Check "Last Used" timestamps
- ✅ Revoke keys that haven't been used in 90+ days
API Endpoints for Management
List API Keys
GET /api/v1/api-keys?user_group_id=1Create API Key
POST /api/v1/api-keys
{
  "name": "Production Key",
  "user_group_id": 1,
  "description": "Key for production environment",
  "expires_in_days": 90
}
Revoke API Key
POST /api/v1/api-keys/{id}/revokeDelete API Key
DELETE /api/v1/api-keys/{id}Manage Proxy Access
List Proxy Access for User Group
GET /api/v1/user-groups/{id}/proxy-accessResponse:
{
  "success": true,
  "data": {
    "proxy_access": [
      {
        "id": 1,
        "user_group_id": 1,
        "proxy_config_id": 6,
        "proxy_name": "custom-LiteLLM",
        "proxy_type": "llm",
        "permissions": "{}",
        "rate_limit": 60,
        "active": true,
        "created_at": "2025-10-23T11:28:21Z"
      }
    ]
  }
}
Assign Proxy Access
POST /api/v1/user-groups/{id}/proxy-access
{
  "proxy_config_id": 6,
  "permissions": "{}",
  "rate_limit": 60
}
Update Proxy Access (Rate Limit)
PUT /api/v1/user-groups/{id}/proxy-access/{access_id}
{
  "rate_limit": 120
}
Example:
curl -X PUT \
  -H "Content-Type: application/json" \
  -H "Cookie: session_token=..." \
  -d '{"rate_limit": 120}' \
  http://localhost:8080/api/v1/user-groups/1/proxy-access/1
Remove Proxy Access
DELETE /api/v1/user-groups/{id}/proxy-access/{proxy_id}Context Information
When an API key is successfully authenticated, the following information is added to the request context:
// Available in proxy handlers
apiKey := auth.GetAPIKeyFromContext(r.Context())
// Contains:
// - ID
// - Name
// - UserGroupID
// - UserGroup.Name
// - Active status
// - Request count
// - Last used timestamp

proxyAccess := auth.GetProxyAccessFromContext(r.Context())
// Contains:
// - ProxyConfigID
// - Permissions
// - RateLimit
// - Active status
This allows proxies to:
- Log which user group made the request
- Apply custom logic based on the API key
- Track usage by user group
- Implement additional authorization checks
API Key Authentication Troubleshooting
Issue: "Missing API key"
Cause: No API key provided in request headers
Solution: Add X-API-Key header with your API key
Issue: "Invalid API key"
Causes:
- API key was revoked
- API key has expired
- User group is inactive
- Typo in API key
Solution:
- Check API key status in web UI
- Verify user group is active
- Generate a new API key if needed
Issue: "API key does not have access to this proxy"
Cause: User group doesn't have proxy access assigned
Solution:
- Go to Access & Identity → Teams & API Keys → select the team
- In Pipeline mode, use the Gateway section to assign the proxy; in Table mode, click the team → Proxy Access → + Assign Proxy
- Select the proxy and assign it
Issue: Rate limit exceeded
Cause: Exceeded configured rate limit
Solution:
- Wait for rate limit to reset (check
X-RateLimit-Resetheader) - Request rate limit increase for your user group
- Implement request throttling in your client
FAQ
Q: Can I use the same API key for multiple proxies?
A: Yes! If your user group has access to multiple proxies, a single API key can be used to access all of them.
Q: Can I have multiple API keys in one user group?
A: Yes! This is recommended for:
- Different environments (dev, staging, production)
- Different applications
- Key rotation without downtime
Q: What happens if I revoke an API key?
A: The key immediately stops working. All requests using that key will return 401 Unauthorized.
Q: Can I see which API keys are being used?
A: Yes! Check the "Last Used" timestamp and request count in the API Keys table.
Q: How do I rotate API keys without downtime?
A:
- Create a new API key
- Update your applications to use the new key
- Verify the new key is working (check "Last Used")
- Revoke the old key
Q: Can I set API keys to expire automatically?
A: Yes! When creating an API key, set the expires_in_days parameter. The key will automatically become invalid after that period.
Q: Do API keys work with all proxy types (MCP and LLM)?
A: Yes! API keys work with both MCP and LLM proxies. The authentication is handled at the gateway level, before reaching the target service.
API Key See Also
- User Groups Management - See OAuth User Access Control section
- Proxy Access Control - See Proxy OAuth Configuration section
- Unified Web API