OAuth Provider Setup Guide
This guide walks you through setting up OAuth providers in the AI Security Gateway to enable user authentication.
What is an OAuth Provider?
An OAuth provider allows users to authenticate using their existing accounts (GitHub, Google, Okta, etc.) instead of maintaining separate credentials in the Gateway. Once configured, users can log in through their organization's identity provider.
Prerequisites
- AI Security Gateway running at http://localhost:8080
- Admin access to the web interface
- An OAuth application registered with your chosen provider (GitHub, Google, Okta, etc.)
Step 1: Choose Your OAuth Provider
The Gateway supports multiple OAuth providers:
Development/Testing:
- GitHub - Easy setup, great for developers
- Google - Simple OAuth implementation
Enterprise:
- Okta - Enterprise identity management
- Azure AD / Entra ID - Microsoft integration
- Auth0 - Universal authentication
- Keycloak - Self-hosted identity server
- GitLab - Self-hosted or cloud
Step 2: Register Application with Provider
You need to create an OAuth application with your chosen provider. Here's how for common providers:
GitHub
- Navigate to GitHub Settings → Developer Settings → OAuth Apps
- Click "New OAuth App"
- Fill in:
- Application name: AI Security Gateway
- Homepage URL: http://localhost:8080
- Authorization callback URL:
http://localhost:8080/api/v1/oauth/callback
- Click "Register application"
- Copy the Client ID and generate a Client Secret
Google
- Open Google Cloud Console
- Navigate to APIs & Services → Credentials
- Click "Create Credentials" → "OAuth 2.0 Client ID"
- Configure consent screen if prompted
- Select "Web application"
- Add redirect URI:
http://localhost:8080/api/v1/oauth/callback - Copy the Client ID and Client Secret
Okta
- Open Okta Admin Console
- Navigate to Applications → Applications
- Click "Create App Integration"
- Select "OIDC - OpenID Connect" → "Web Application"
- Set redirect URI:
http://localhost:8080/api/v1/oauth/callback - Set scopes:
openid,profile,email - Copy the Client ID and Client Secret
Step 3: Add Provider in Gateway
Using the Web Interface
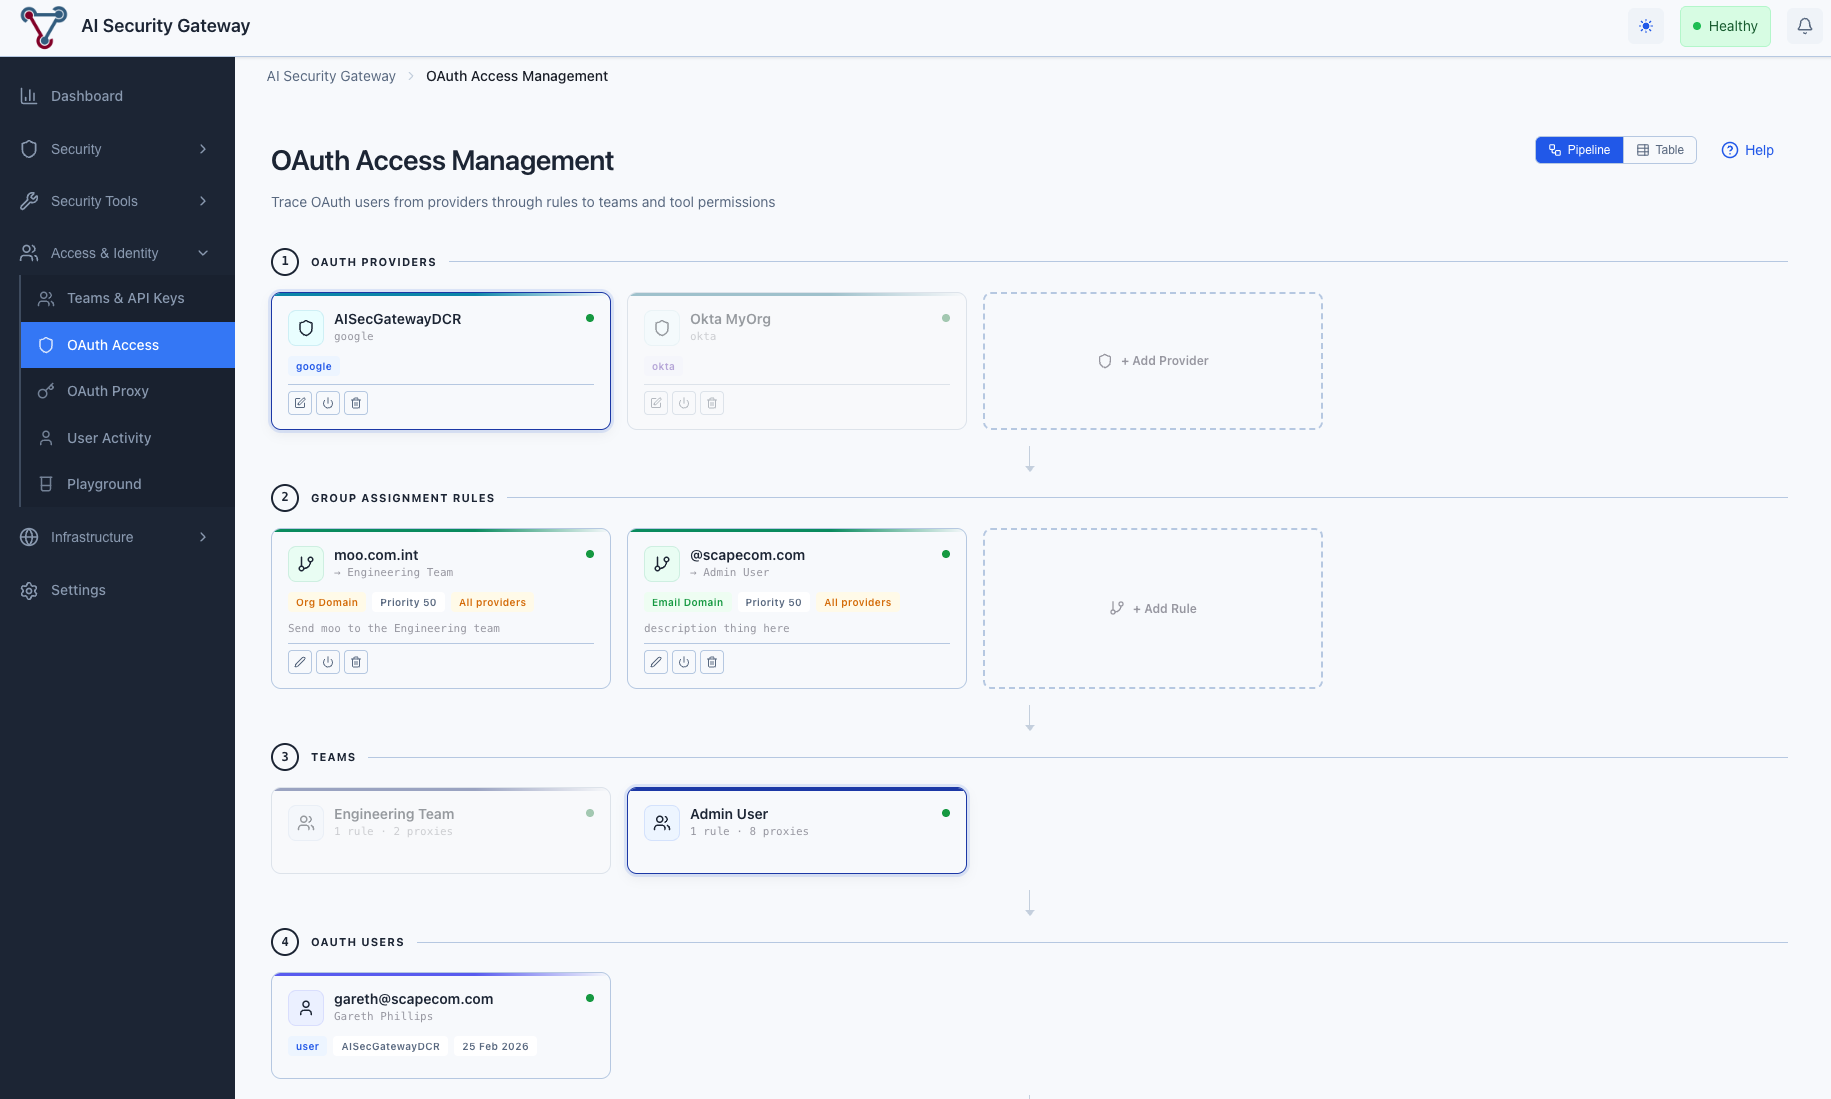
- Navigate to Access & Identity → OAuth Access
- You can add providers from either view mode:
- Pipeline mode (default): Click + Add Provider in the OAuth Providers section
- Table mode: Switch to Table, select the OAuth Providers tab, click Add OAuth Provider
- Select "Use Template" tab (recommended)
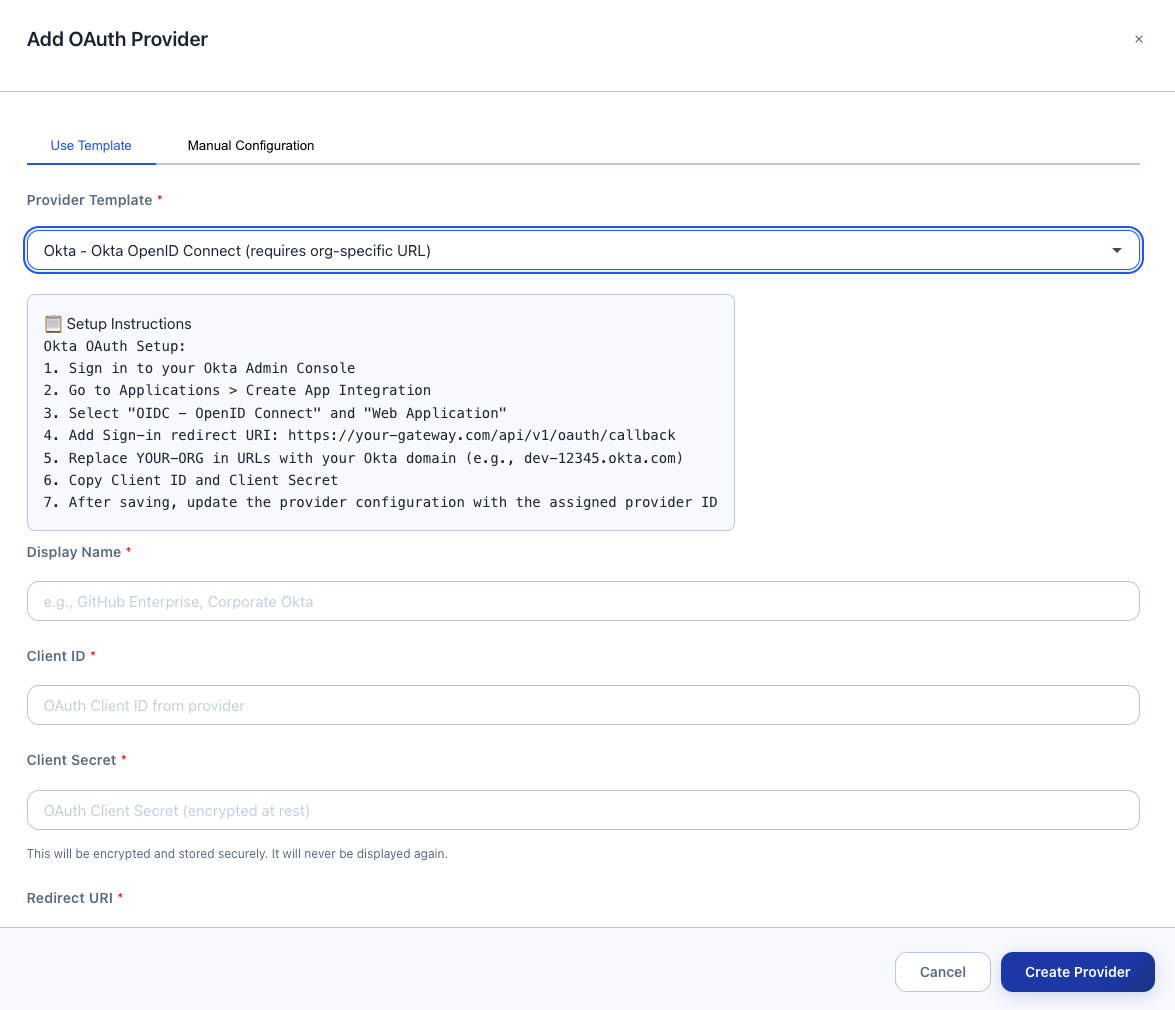
Choose your provider from the dropdown:
- Example: "GitHub - GitHub OAuth 2.0 authentication"
- Setup instructions appear automatically
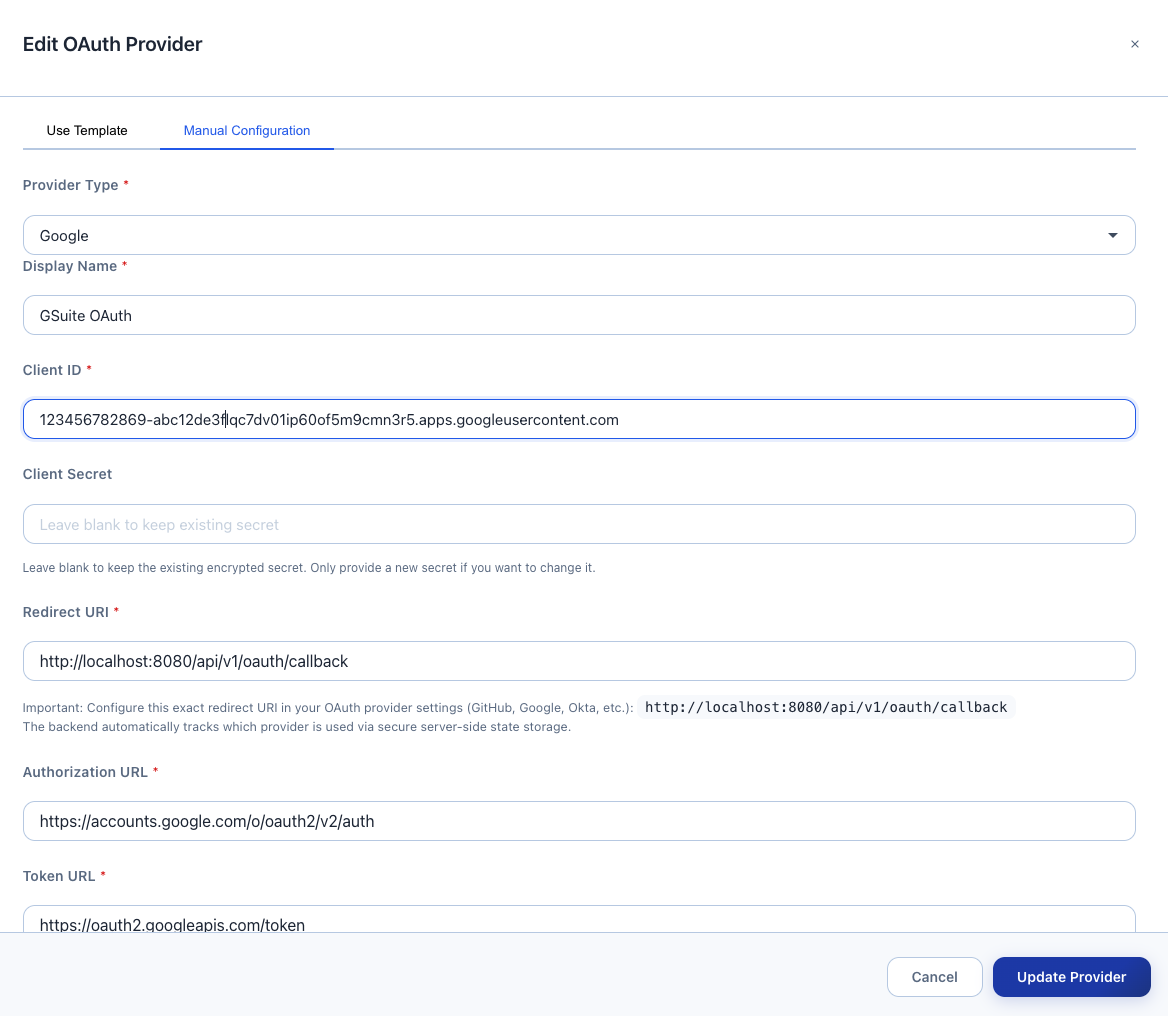
Fill in the form:
- Display Name: e.g., "Corporate GitHub"
- Client ID: Paste from Step 2
- Client Secret: Paste from Step 2 (encrypted at rest)
- Redirect URI: Pre-filled as
http://localhost:8080/api/v1/oauth/callback - Scopes: Auto-filled from template
- Click "Create Provider"
- Provider appears in the list with status "Enabled"
Important: The Gateway uses a single callback URL for all providers:
http://localhost:8080/api/v1/oauth/callbackThe Gateway automatically routes callbacks to the correct provider using internal state management. You don't need to add provider IDs or query parameters.
For production: Replace localhost:8080 with your domain:
https://gateway.company.com/api/v1/oauth/callbackStep 4: Test OAuth Authentication
View Provider Status
- Navigate to Access & Identity → OAuth Access
- In Pipeline mode, your provider appears as a card; in Table mode, switch to the OAuth Providers tab
- Your provider should show:
- Status badge: "Enabled"
- Active Sessions: 0 (no users yet)
- Redirect URI with copy button
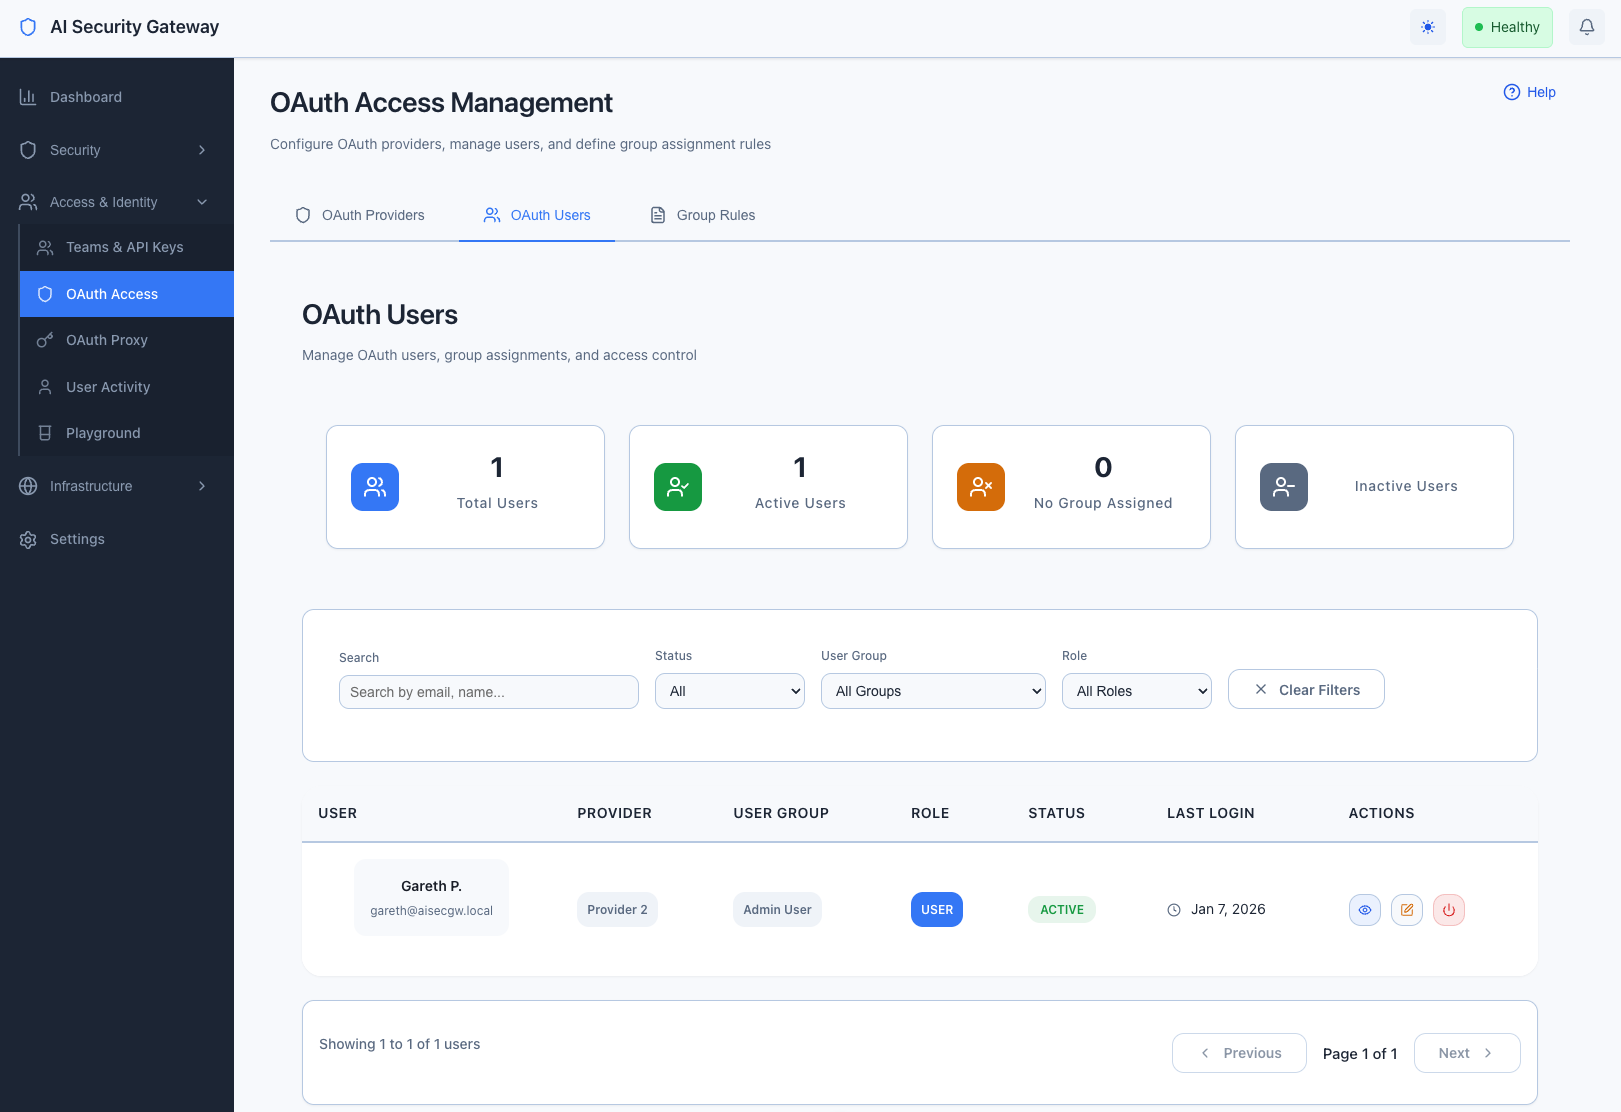
View Authenticated Users
Once users start accessing proxies via authenticated sessions you will the user list populate:
- Navigate to Access & Identity → OAuth Access → switch to Table mode → OAuth Users tab
- After users authenticate, they appear with:
- Provider badge
- Email address
- Last login timestamp
- User group assignment
Next Steps
Enable OAuth on Proxies
Now that your OAuth provider is configured, you can enable user authentication on your proxies. See the OAuth Proxy Guide for:
- Enabling OAuth authentication on MCP/LLM proxies
- Configuring Dynamic Client Registration for MCP clients
- Setting up user group assignments
- Managing OAuth sessions per proxy
Manage OAuth Users
Once users start authenticating:
- View all users: Navigate to OAuth Access → Table mode → OAuth Users tab, or use Pipeline mode to select a provider → team → see users inline
- Assign user groups: Edit users to assign to teams/departments
- Set permissions: In Pipeline mode, select a user to manage per-user tool permission overrides directly
- Monitor sessions: View active sessions per provider
Set Up User Group Rules
Automate user group assignments based on email domains:
- Navigate to OAuth Access → Table mode → Group Rules tab, or use Pipeline mode where rules appear after selecting a provider
- Click "Create Rule" (Table mode) or "+ Add Rule" (Pipeline mode)
- Configure:
- Email Pattern:
*@company.com - User Group: Engineering Team
- Priority: 1 (higher priority = evaluated first)
- Email Pattern:
- Users matching the pattern automatically join the group
[Screenshot: Group Rules page with example rule]
Common Provider Configurations
Multiple Providers
You can configure multiple OAuth providers for different use cases:
- GitHub: For developer authentication
- Google Workspace: For corporate email users
- Okta: For enterprise SSO
Users can authenticate with any enabled provider.
Production Domains
For production deployments, update callback URLs in both the Gateway and your OAuth provider:
Development:  http://localhost:8080/api/v1/oauth/callback
Production:   https://gateway.company.com/api/v1/oauth/callback
Troubleshooting
Provider creation fails:
- Verify Client ID and Client Secret are correct
- Check callback URL matches exactly
- Ensure provider application is active
Callback fails:
- Verify callback URL in provider settings matches:
http://localhost:8080/api/v1/oauth/callback - Check Gateway logs for specific error messages
Users can't authenticate:
- Ensure provider status is "Enabled"
- Verify user has access in your OAuth provider settings
- Check Gateway logs for authentication errors
For detailed technical information, see the OAuth Technical Documentation.
Related Guides
- OAuth Proxy Guide - Enable OAuth on MCP/LLM proxies
- User Group Management - Managing user assignments
Security Notes
- Client secrets are encrypted at rest using AES-256-GCM
- Secrets are never displayed after initial creation
- All OAuth flows use PKCE for enhanced security
- Session tokens are automatically managed by the Gateway
Note: Encryption is handled transparently - no manual key management required.