Installation Guide
This guide covers the complete installation process for AI Security Gateway, from prerequisites to running the API server with web interface.
System Requirements
Minimum Requirements
- CPU: 2 core (4+ cores recommended)
- RAM: 512MB (1GB+ recommended)
- Disk: 100MB free space
- Network: Internet connection for OAuth providers (optional)
Operating System Support
- Linux: x86_64 (amd64) or ARM64
- Ubuntu 20.04+, Debian 10+, CentOS 7+, RHEL 7+, Alpine Linux 3.12+
- macOS: 10.15+ (Intel or Apple Silicon)
- Windows: Windows 10+ (amd64)
Network Requirements
- Outbound HTTPS (443) for MCP server and LLM API connections
- API server port (default: 8080)
- Individual proxy ports (configurable per proxy instance)
- OAuth provider endpoints (if OAuth authentication enabled)
- SIEM/SOAR/Slack integration endpoints (if configured)
Quick Installation (Recommended)

Download Pre-Built Binary
Choose the appropriate binary for your platform:
Linux (AMD64):
curl -LO https://github.com/syphon1c/ai-security-gateway/releases/latest/download/unified-admin-linux-amd64.tar.gz
tar -xzf unified-admin-linux-amd64.tar.gz
cd unified-admin-linux-amd64
chmod +x unified-admin
Linux (ARM64):
curl -LO https://github.com/syphon1c/ai-security-gateway/releases/latest/download/unified-admin-linux-arm64.tar.gz
tar -xzf unified-admin-linux-arm64.tar.gz
cd unified-admin-linux-arm64
chmod +x unified-admin
macOS (Apple Silicon):
curl -LO https://github.com/syphon1c/ai-security-gateway/releases/latest/download/unified-admin-darwin-arm64.tar.gz
tar -xzf unified-admin-darwin-arm64.tar.gz
cd unified-admin-darwin-arm64
chmod +x unified-admin
macOS (Intel):
curl -LO https://github.com/syphon1c/ai-security-gateway/releases/latest/download/unified-admin-darwin-amd64.tar.gz
tar -xzf unified-admin-darwin-amd64.tar.gz
cd unified-admin-darwin-amd64
chmod +x unified-admin
Windows (PowerShell):
# Download from GitHub Releases page
# https://github.com/syphon1c/ai-security-gateway/releases/latest/download/unified-admin-windows-amd64.zip
# Extract to a folder (e.g., C:\ai-security-gateway)
# Open PowerShell in that folder
Run Installation Script (Recommended)
Linux/macOS:
chmod +x install.sh verify.sh start.sh
./install.sh  # Generates secure keys, sets up .env automatically
Windows:
# Manual setup (see QUICKSTART.md for details)
Copy-Item .env.example .env
notepad .env  # Edit and set JWT_SECRET and ENCRYPTION_KEY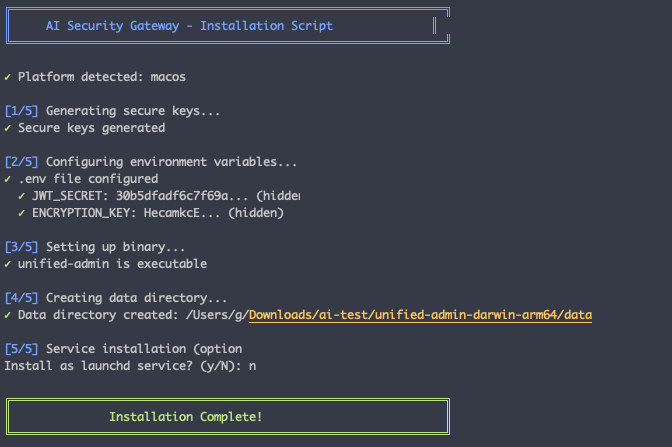
Start the Gateway
Admin console password generated on first run
If you run the start.sh script or manually run the ./unified-admin binary, the logs in the console should produce the randomly generated admin console logon password for you but only on the first run, when seeding the database. If its not seen by the start.sh script and logged check in the log file backend.log for the generated password.
You can change it once you logged into the console.
Option A: Using Helper Scripts (Easiest)
Linux/macOS:
./verify.sh  # Verify installation
./start.sh   # Start backend + frontend
Windows:
.\start.ps1 # Start backend + frontend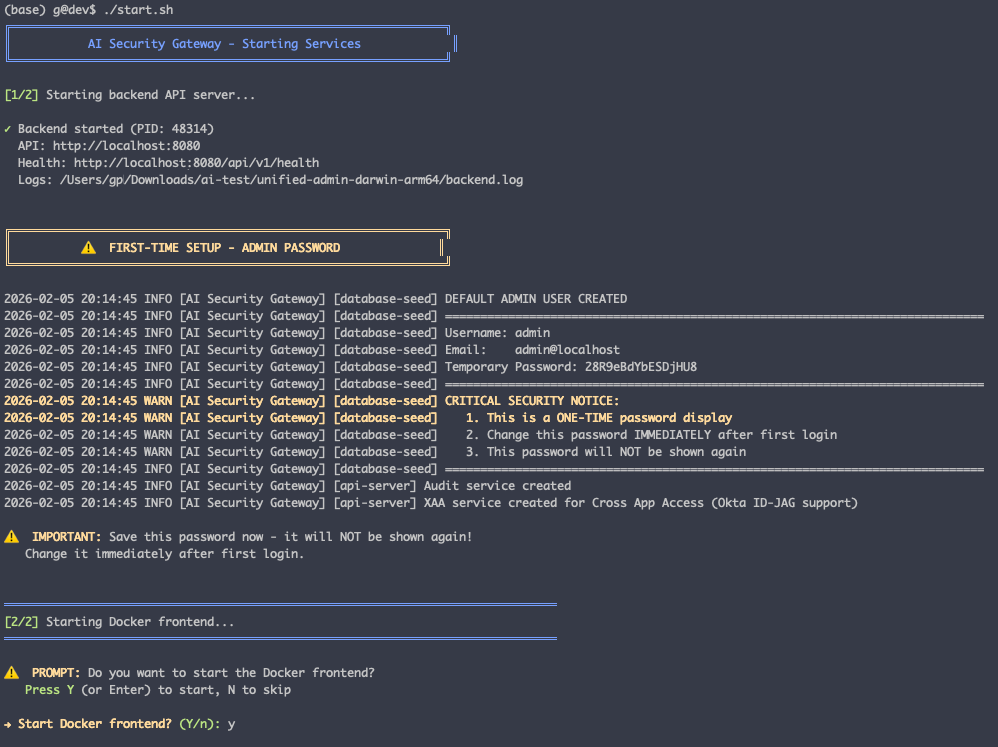
Remember to look out for the generated admin password on first run, if you missed, cat the backend.log file:
============================================================
DEFAULT ADMIN USER CREATED
============================================================
Username: admin
Email:    admin@localhost
Temporary Password: S0m3R4nd0m!
============================================================
CRITICAL SECURITY NOTICE:
1. This is a ONE-TIME password display
2. Change this password IMMEDIATELY after first login
3. This password will NOT be shown again
============================================================
You can then logon to the console with admin / [generated password]
Option B: Manual Start
You can choose to manually run the solution:
Linux/macOS:
# Terminal 1: Start backend
./unified-admin

# Terminal 2: Start Docker frontend (optional)
docker-compose -f docker-compose.frontend.yml up -d
Windows:
# PowerShell 1: Start backend
.\unified-admin.exe

# PowerShell 2: Start Docker frontend (optional)
docker-compose -f docker-compose.frontend.yml up -d
Access the web interface:
- Docker Frontend: http://localhost
- Native Backend: http://localhost:8080
Verify installation
# Check API health
curl http://localhost:8080/api/v1/health

# Expected: {"status":"ok","version":"...","timestamp":"..."}
For detailed instructions, see QUICKSTART.md in the release package.
Why this approach:
- ✅ Pre-Built Binary: Zero compilation, instant deployment
- ✅ Embedded Frontend: Web UI included in binary (no separate deployment needed)
- ✅ Maximum Performance: Native binary, no container overhead
- ✅ Production Ready: Systemd service, proper logging, security hardening
- ✅ Easy Updates: Download new binary, restart service
Access Points
- Docker Frontend: http://localhost (recommended frontend)
- API Endpoints: http://localhost:8080/api/v1/*
- WebSocket: ws://localhost:8080/ws
Installation Support
For installation issues:
- Check Troubleshooting Guide
- Review API Examples for common workflows
- Check logs:
tail -f logs/unified-admin.logordocker-compose logs -f - Verify environment variables are set correctly
- Ensure database directory has write permissions
- Test network connectivity to target MCP servers or LLM APIs
For OAuth issues:
- Review OAuth Setup Guide
- Check provider credentials are correct
- Verify callback URLs are configured in OAuth provider settings
- Ensure
JWT_SECRETandENCRYPTION_KEYare set
For proxy issues:
- Check proxy status in web interface or via
/api/v1/proxies/{id}/status - View proxy logs:
/api/v1/proxies/{id}/logs - Verify target endpoint is accessible
- Check security policies are not blocking legitimate traffic