Using Claude Code with AI Security Gateway
Overview
The AI Security Gateway now has built-in Provider Authentication that handles LLM provider credentials automatically. You no longer need to configure nginx proxies or custom header injection - the gateway manages provider authentication for you while your end users authenticate with the gateway using OAuth or API keys.
Quick Setup (Recommended)
With the new Provider Authentication feature, setting up Claude Code takes just 3 simple steps:
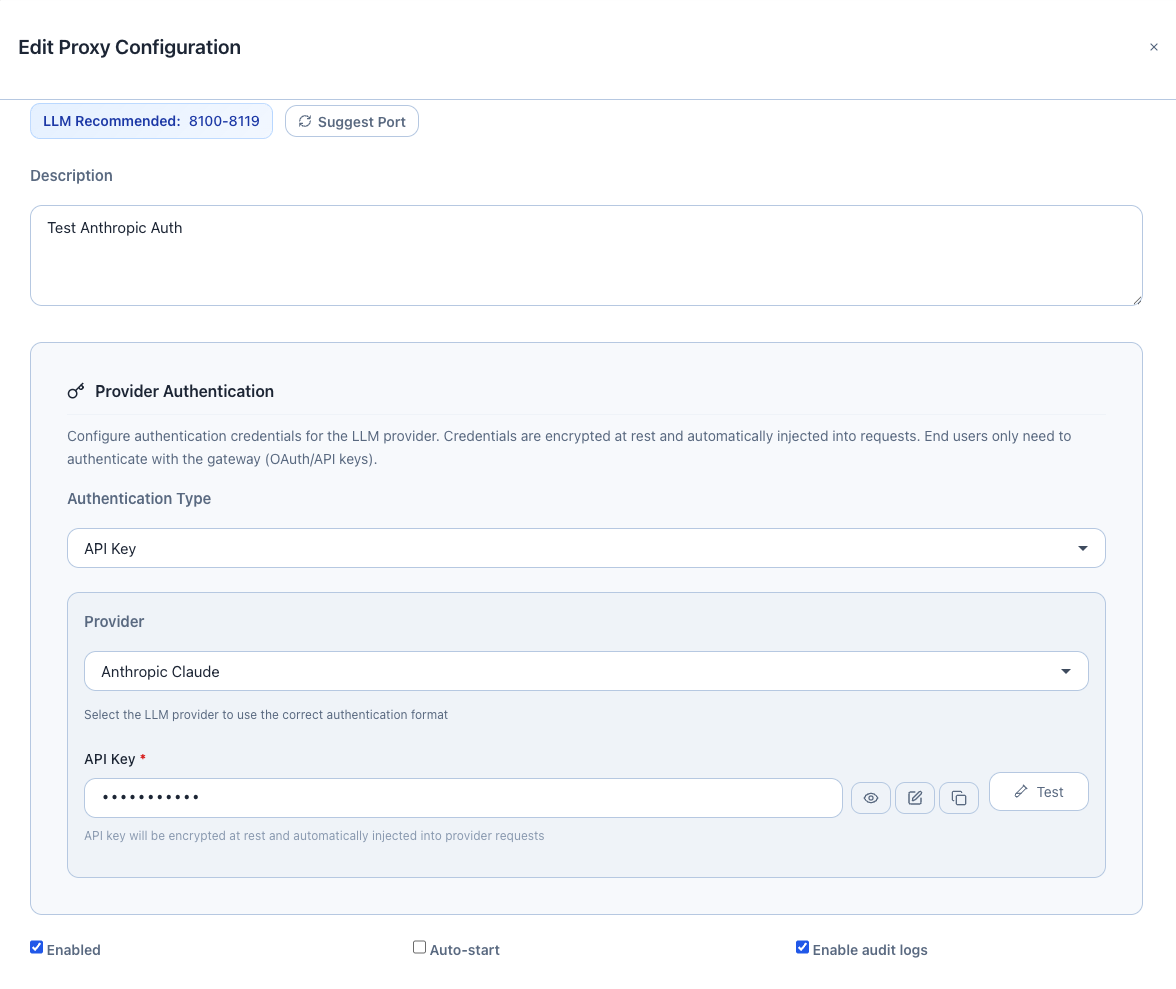
Step 1: Configure Provider Authentication in the Web UI
- Open the AI Security Gateway Web UI
- Navigate to Proxies page
- Create or edit an LLM proxy for Anthropic
- In the Provider Authentication section:
- Authentication Type: Select
API Key - Provider: Select
Anthropicfrom the dropdown - API Key: Enter your Anthropic API key (e.g.,
sk-ant-api03-...) - Click Validate Authentication to test the connection
- Click Save to store the configuration (credentials are encrypted at rest)
- Authentication Type: Select
Available Authentication Types:
- API Key: For most providers (OpenAI, Anthropic, Cohere, etc.)
- Custom Headers: For providers with custom authentication headers
- AWS Bedrock: For AWS Bedrock with IAM credentials
Supported Providers:
- Anthropic (Claude)
- OpenAI (GPT models)
- Azure OpenAI
- AWS Bedrock (Anthropic, Amazon models)
- Google Gemini
- Cohere
- Mistral AI
- Perplexity AI
- Together AI
- Groq
- OpenRouter
- Fireworks AI
Step 2: Grant User Access
Ensure your user or team is assigned access to the proxy:
- Navigate to User Groups in the Web UI
- Find or create the user group for your API user
- Assign the LLM proxy to the group
- Generate an API key for the user (if not already done)
Step 3: Configure Claude Code Environment Variables
Set these environment variables for Claude Code to use the gateway:
export ANTHROPIC_BASE_URL=http://ai-sec-gateway.local:8033/
export ANTHROPIC_AUTH_TOKEN="uag_kbx9abcdef1234567890..."  # Your AI Security Gateway API key
export ANTHROPIC_MODEL="custom--us.anthropic.claude-sonnet-4-5-20250929-v1"
Replace:
ai-sec-gateway.local:8033with your gateway hostname and LLM proxy portuag_kbx9...with your AI Security Gateway API key- Model name with your desired Claude model
That's it! Claude Code will now:
- Send requests to the AI Security Gateway
- Authenticate using your gateway API key (
X-API-Keyheader) - Gateway automatically injects the provider API key (from Provider Authentication)
- All traffic is monitored, logged, and protected by security policies
How It Works
┌─────────────────┐
│   Claude Code   │  export ANTHROPIC_BASE_URL=http://gateway:8033/
└────────┬────────┘  export ANTHROPIC_AUTH_TOKEN="uag_kbx9..."
         │ Authorization: Bearer uag_kbx9...
         ↓
┌─────────────────┐
│ AI Security     │  1. Validates gateway API key (X-API-Key)
│ Gateway         │  2. Injects provider credentials (encrypted at rest)
│ (Port 8033)     │  3. Applies security policies
└────────┬────────┘  4. Logs request + response
         │ Authorization: Bearer sk-ant-api03-... (from Provider Auth)
         ↓
┌─────────────────┐
│ Anthropic API   │  Receives authenticated request
└─────────────────┘
Benefits:
- ✅ No nginx or proxy scripts needed - Provider Authentication handles credentials
- ✅ Encrypted credential storage - Provider keys encrypted at rest in the database
- ✅ Automatic credential injection - Gateway adds provider auth to every request
- ✅ User-level authentication - End users authenticate with gateway (OAuth/API keys)
- ✅ Centralized credential management - Update provider keys in one place
- ✅ Security monitoring - All requests logged and analyzed
- ✅ Policy enforcement - Apply security rules before reaching the provider
Testing the Setup
Once you've configured Provider Authentication and set the environment variables, test your setup:
Test with curl
curl -X POST http://ai-sec-gateway.local:8033/v1/messages \
  -H "X-API-Key: uag_kbx9abcdef1234567890..." \
  -H "Content-Type: application/json" \
  -d '{
    "model": "custom--us.anthropic.claude-sonnet-4-5-20250929-v1",
    "messages": [{"role": "user", "content": "Hello, how are you?"}],
    "max_tokens": 100
  }'
Expected result: 200 OK with Claude's response. The gateway automatically injected the provider API key.
Test with Claude Code
After setting the environment variables, start Claude Code and send a request. It should work seamlessly.
Check Gateway Logs
View the request logs in the Web UI:
- Navigate to Proxies page
- Click the Logs button on your LLM proxy
- You should see authenticated requests with your user/team information
Troubleshooting
Issue: 401 Unauthorized
Cause: Gateway API key is missing or invalid
Solution:
- Verify your
ANTHROPIC_AUTH_TOKENenvironment variable is set correctly - Check that the API key exists in User Groups → API Keys
- Ensure the user/team has access to the LLM proxy
- Test the API key:bash
curl -H "X-API-Key: uag_kbx9..." http://ai-sec-gateway.local:8033/v1/models
Issue: 403 Forbidden
Cause: User doesn't have access to the proxy
Solution:
- Navigate to User Groups in the Web UI
- Find your user group
- Assign the LLM proxy to the group
Issue: Provider Authentication Failed
Cause: Provider API key is invalid or expired
Solution:
- Go to Proxies → Edit your LLM proxy
- In Provider Authentication section, click Validate Authentication
- If validation fails, update the provider API key
- Save the configuration
Issue: Connection Refused
Cause: Gateway proxy is not running
Solution:
- Go to Proxies page
- Check the status of your LLM proxy
- Click Start if it's stopped
- Verify the port is correct in
ANTHROPIC_BASE_URL
Advanced Configuration
Custom Headers Authentication
For providers with custom authentication headers:
- Authentication Type: Select
Custom Headers - Add header name/value pairs (e.g.,
X-Custom-Auth: token123) - Click Validate Authentication to test
- Save the configuration
AWS Bedrock Authentication
For AWS Bedrock with IAM credentials:
- Authentication Type: Select
AWS Bedrock - Enter:
- AWS Region: (e.g.,
us-east-1) - AWS Access Key ID: Your AWS access key
- AWS Secret Access Key: Your AWS secret key
- AWS Region: (e.g.,
- Click Validate Authentication to test
- Save the configuration
Why Use Provider Authentication?
Security Benefits
- ✅ Centralized credential management: Update provider keys in one place
- ✅ Encrypted storage: Provider credentials encrypted at rest in the database
- ✅ Audit trail: All requests logged with user attribution
- ✅ Policy enforcement: Apply security rules before reaching the provider
- ✅ User-level access control: OAuth/API key authentication for end users
- ✅ No credential exposure: End users never see provider API keys
Operational Benefits
- ✅ No proxy scripts needed: Built-in provider authentication
- ✅ Simple setup: Just configure once in the Web UI
- ✅ Cost tracking: Monitor token usage per user/team
- ✅ Rate limiting: Control usage per user or globally
- ✅ Multi-provider support: Switch providers without changing client code