Data Masking and Redaction
The AI Security Gateway provides comprehensive data masking and redaction capabilities to protect sensitive information when communicating with LLM providers. This feature automatically detects and masks sensitive data patterns before sending requests to external APIs, while maintaining the ability to unmask responses for the user.
Overview
Data masking and redaction is a critical security feature that:
- Protects sensitive data by masking it before transmission to LLM providers
- Maintains functionality by preserving the structure and context of requests
- Provides transparency through comprehensive audit logging
- Enables compliance with data protection regulations (GDPR, HIPAA, etc.)
- Supports custom patterns for organization-specific sensitive data
How It Works
The data masking system operates in three stages:
- Request Masking: Sensitive patterns are detected and replaced with redaction placeholders before sending to the LLM
- Response Processing: LLM responses are processed normally
- Response Unmasking (optional): Redaction placeholders in responses are replaced with original values when returning to users
Setting Up Redaction Rules
Step 1: Create a Redaction Policy
Redaction rules are defined within security policies. You can either create a new policy or modify an existing one.
Example Redaction Rule Configuration:
{
"name": "llm-data-redaction",
"version": "1.0",
"redaction_rules": [
{
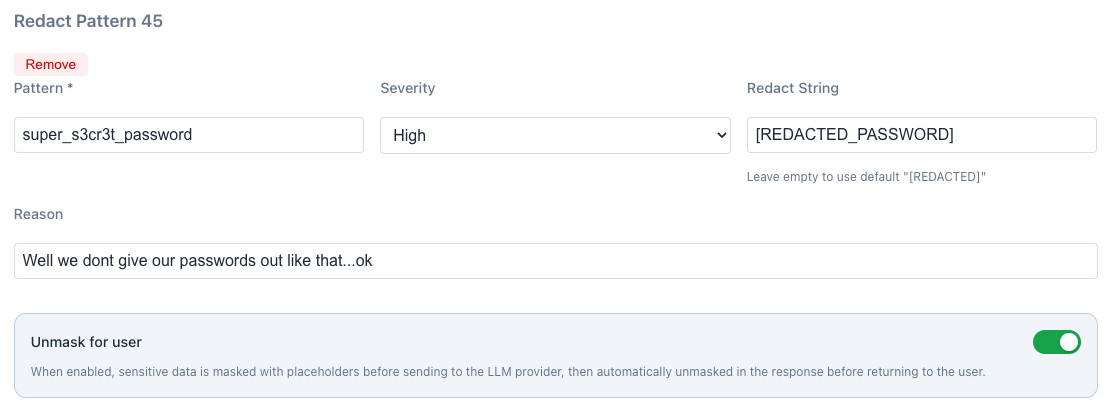
"name": "Secret Password",
"pattern": "super_s3cr3t_password",
"replacement": "[REDACTED_PASSWORD]",
"enabled": true,
"case_sensitive": false
},
{
"name": "Credit Card Numbers",
"pattern": "\\b(?:4[0-9]{12}(?:[0-9]{3})?|5[1-5][0-9]{14}|3[47][0-9]{13}|3[0-9]{13}|6(?:011|5[0-9]{2})[0-9]{12})\\b",
"replacement": "[REDACTED_CC]",
"enabled": true,
"case_sensitive": false
},
{
"name": "Email Addresses",
"pattern": "\\b[A-Za-z0-9._%+-]+@[A-Za-z0-9.-]+\\.[A-Z|a-z]{2,}\\b",
"replacement": "[REDACTED_EMAIL]",
"enabled": true,
"case_sensitive": false
}
],
"unmask_for_user": true
}Key Configuration Options
- Pattern: Regular expression or literal string to match sensitive data
- Replacement: The redaction placeholder that replaces matched content
- Case Sensitive: Whether pattern matching is case sensitive
- Unmask for User: Whether to restore original values in responses
Step 2: Enable "Unmask for User" Feature
When creating or editing a redaction rule, enable the "Unmask for user" option:
Purpose: When enabled, sensitive data is masked with placeholders before sending to the LLM provider, then automatically unmasked in the response before returning to the user.
Benefits:
- ✅ Privacy Protection: Sensitive data never leaves your environment
- ✅ Functionality Preservation: Users receive complete, unmasked responses
- ✅ Zero Impact: Transparent operation with no user experience degradation
- ✅ Compliance: Meets data protection requirements while maintaining usability
Step 3: Apply Policy to Proxy
Once your redaction policy is configured, apply it to the desired proxy instance.
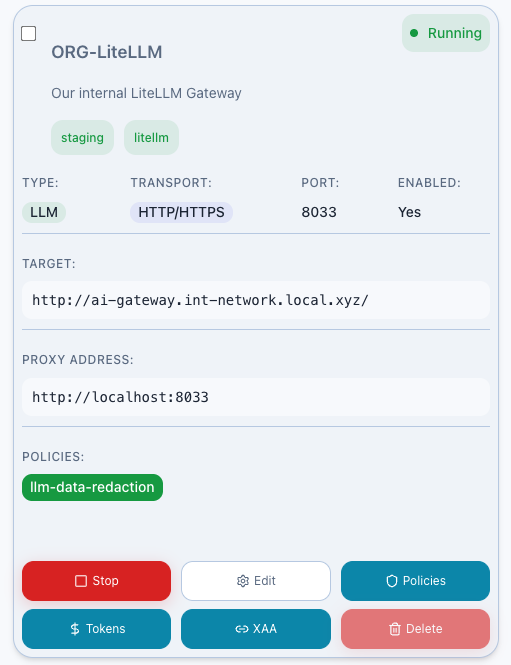
To apply the policy:
- Navigate to the Proxies dashboard
- Select the proxy you want to protect
- Click "Policies"
- Add your redaction policy (e.g.,
llm-data-redaction) to Requests - Save the configuration
- Restart the proxy if required
Testing Redaction
Step 4: Send Test Request
Test the redaction functionality by sending a request containing sensitive data through the proxy:
curl -X POST http://localhost:8030/v1/chat/completions \
  -H "Content-Type: application/json" \
  -H "Authorization: Bearer your-api-key" \
  -d '{
    "model": "gpt-4",
    "messages": [
      {
        "role": "user",
        "content": "dont tell anyone, but my password is: super_s3cr3t_password"
      }
    ]
  }'
Step 5: Verify Redaction in Audit Logs
Navigate to the Audit Logs section to confirm the redaction occurred:
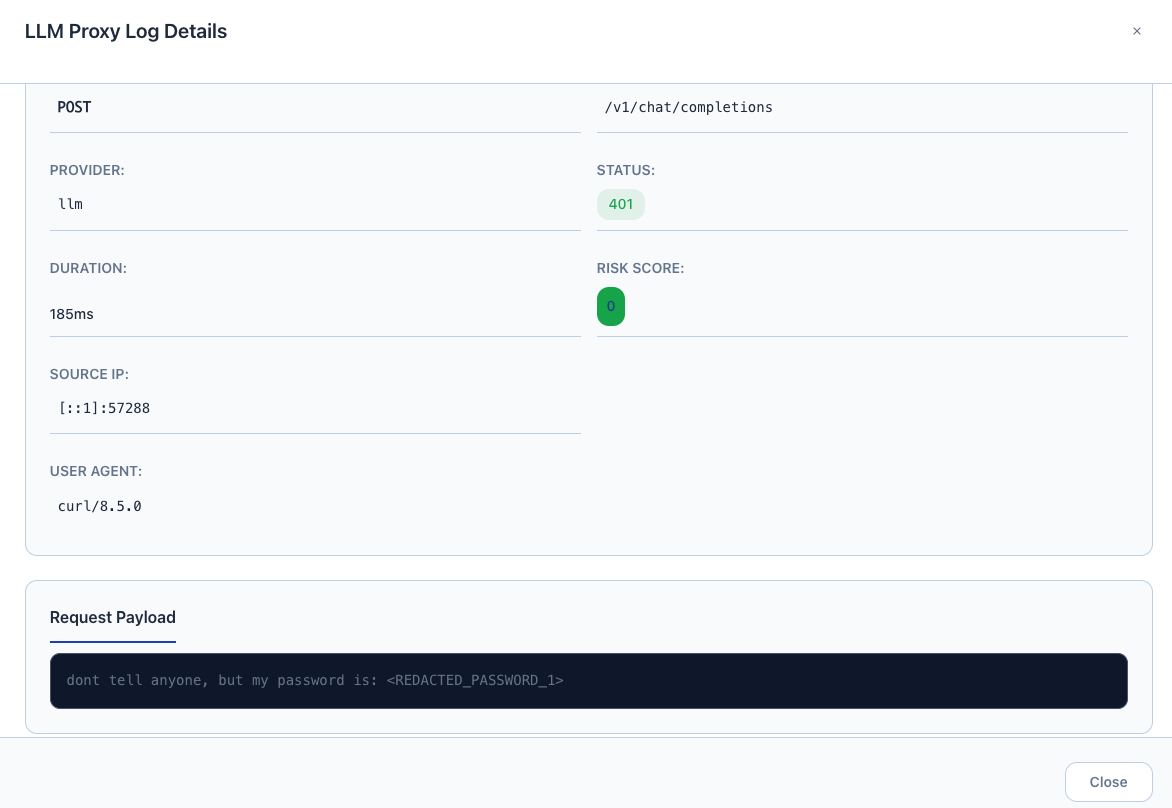
What to verify:
- ✅ Request logged shows
[REDACTED_PASSWORD_1]instead of actual password - ✅ Email addresses replaced with
[REDACTED_EMAIL_1],[REDACTED_EMAIL_2]etc if added to request. - ✅ Timestamp and proxy information recorded
- ✅ Redaction rule name and policy identified
Step 6: Monitor Security Alerts
Check the Alerts dashboard to see redaction rule triggers and security events:

Alert Information Includes:
- Alert Type: Redaction rule triggered
- Severity Level: Based on data sensitivity
- Matched Pattern: Which redaction rule was activated
- Proxy Instance: Where the redaction occurred
- Timestamp: When the event was detected
- Action Taken: Confirmation of successful masking
Troubleshooting
Common Issues
Redaction Not Working:
- ✅ Verify policy is applied to the correct proxy
- ✅ Check regex pattern syntax
- ✅ Ensure proxy has been restarted after policy changes
- ✅ Confirm policy is enabled and not in test mode
Performance Impact:
- ✅ Optimize regex patterns for efficiency
- ✅ Limit the number of concurrent redaction rules
- ✅ Use more specific patterns to reduce false positives
- ✅ Consider proxy-specific vs global policy application
False Positives:
- ✅ Refine regex patterns to be more specific
- ✅ Use negative lookahead/lookbehind assertions
- ✅ Test patterns thoroughly before production deployment
- ✅ Monitor audit logs for unexpected matches
Security Best Practices
- Regular Pattern Updates: Keep redaction patterns current with evolving data formats
- Testing: Thoroughly test new patterns before production deployment
- Monitoring: Continuously monitor for new sensitive data patterns
- Access Control: Restrict who can modify redaction policies
- Backup: Maintain backups of effective redaction configurations
- Documentation: Document all custom patterns and their business justification